5
More Annotations


6


1
Favourite Annotations


4


5
Text
AUTOGUIDE WITH RASPBERRY PI FOR ASTROPHOTOGRAPHY Prepare Raspberry Pi: Connect camera, key board, power, and so on. Login as pi. Enter password raspberry. Login as root for control GPIO pins, sudo su. I have created a short cut in name 'exe' by nano, just like BAT file in PC. In my case, it will activate 2.8"LCD touch AUTOGUIDE WITH RASPBERRY PI FOR ASTROPHOTOGRAPHY: STAR This project is aiming for autoguiding star with low cost Raspberry Pi computer with webcam camera. Major components in this project are: Raspberry Pi (Rev B) Python (programming language) OpenCV (computer vision libery) Webcam Simple electronic circuit (Scroll to the bottom if you need language translation) AUTOGUIDE WITH RASPBERRY PI FOR ASTROPHOTOGRAPHY: MAY 2014 This project is aiming for autoguiding star with low cost Raspberry Pi computer with webcam camera. Major components in this project are: Raspberry Pi (Rev B) Python (programming language) OpenCV (computer vision libery) Webcam Simple electronic circuit (Scroll to the bottom if you need language translation) AUTOGUIDE WITH RASPBERRY PI FOR ASTROPHOTOGRAPHY: STAR Press 'p' twice to select a star. Auto guiding now. Only show 16x zoom in ROI image area. Integ value will be adjusted by the software automatically. Larger number means darker star, and the star guiding response will be a bit slower. Press 'r' for re-select another star or press 'Esc' to quit this program. AUTOGUIDE WITH RASPBERRY PI FOR ASTROPHOTOGRAPHY Prepare Raspberry Pi: Connect camera, key board, power, and so on. Login as pi. Enter password raspberry. Login as root for control GPIO pins, sudo su. I have created a short cut in name 'exe' by nano, just like BAT file in PC. In my case, it will activate 2.8"LCD touch AUTOGUIDE WITH RASPBERRY PI FOR ASTROPHOTOGRAPHY: STAR This project is aiming for autoguiding star with low cost Raspberry Pi computer with webcam camera. Major components in this project are: Raspberry Pi (Rev B) Python (programming language) OpenCV (computer vision libery) Webcam Simple electronic circuit (Scroll to the bottom if you need language translation) AUTOGUIDE WITH RASPBERRY PI FOR ASTROPHOTOGRAPHY: MAY 2014 This project is aiming for autoguiding star with low cost Raspberry Pi computer with webcam camera. Major components in this project are: Raspberry Pi (Rev B) Python (programming language) OpenCV (computer vision libery) Webcam Simple electronic circuit (Scroll to the bottom if you need language translation) AUTOGUIDE WITH RASPBERRY PI FOR ASTROPHOTOGRAPHY: STAR Press 'p' twice to select a star. Auto guiding now. Only show 16x zoom in ROI image area. Integ value will be adjusted by the software automatically. Larger number means darker star, and the star guiding response will be a bit slower. Press 'r' for re-select another star or press 'Esc' to quit this program. AUTOGUIDE WITH RASPBERRY PI FOR ASTROPHOTOGRAPHY Prepare Raspberry Pi: Connect camera, key board, power, and so on. Login as pi. Enter password raspberry. Login as root for control GPIO pins, sudo su. I have created a short cut in name 'exe' by nano, just like BAT file in PC. In my case, it will activate 2.8"LCD touch AUTOGUIDE WITH RASPBERRY PI FOR ASTROPHOTOGRAPHY: STAR This project is aiming for autoguiding star with low cost Raspberry Pi computer with webcam camera. Major components in this project are: Raspberry Pi (Rev B) Python (programming language) OpenCV (computer vision libery) Webcam Simple electronic circuit (Scroll to the bottom if you need language translation) AUTOGUIDE WITH RASPBERRY PI FOR ASTROPHOTOGRAPHY: MAY 2014 This project is aiming for autoguiding star with low cost Raspberry Pi computer with webcam camera. Major components in this project are: Raspberry Pi (Rev B) Python (programming language) OpenCV (computer vision libery) Webcam Simple electronic circuit (Scroll to the bottom if you need language translation) AUTOGUIDE WITH RASPBERRY PI FOR ASTROPHOTOGRAPHY: STAR Press 'p' twice to select a star. Auto guiding now. Only show 16x zoom in ROI image area. Integ value will be adjusted by the software automatically. Larger number means darker star, and the star guiding response will be a bit slower. Press 'r' for re-select another star or press 'Esc' to quit this program. AUTOGUIDE WITH RASPBERRY PI FOR ASTROPHOTOGRAPHY Prepare Raspberry Pi: Connect camera, key board, power, and so on. Login as pi. Enter password raspberry. Login as root for control GPIO pins, sudo su. I have created a short cut in name 'exe' by nano, just like BAT file in PC. In my case, it will activate 2.8"LCD touch AUTOGUIDE WITH RASPBERRY PI FOR ASTROPHOTOGRAPHY: STAR This project is aiming for autoguiding star with low cost Raspberry Pi computer with webcam camera. Major components in this project are: Raspberry Pi (Rev B) Python (programming language) OpenCV (computer vision libery) Webcam Simple electronic circuit (Scroll to the bottom if you need language translation) AUTOGUIDE WITH RASPBERRY PI FOR ASTROPHOTOGRAPHY: MAY 2014 This project is aiming for autoguiding star with low cost Raspberry Pi computer with webcam camera. Major components in this project are: Raspberry Pi (Rev B) Python (programming language) OpenCV (computer vision libery) Webcam Simple electronic circuit (Scroll to the bottom if you need language translation) AUTOGUIDE WITH RASPBERRY PI FOR ASTROPHOTOGRAPHY: STAR Press 'p' twice to select a star. Auto guiding now. Only show 16x zoom in ROI image area. Integ value will be adjusted by the software automatically. Larger number means darker star, and the star guiding response will be a bit slower. Press 'r' for re-select another star or press 'Esc' to quit this program. AUTOGUIDE WITH RASPBERRY PI FOR ASTROPHOTOGRAPHY Prepare Raspberry Pi: Connect camera, key board, power, and so on. Login as pi. Enter password raspberry. Login as root for control GPIO pins, sudo su. I have created a short cut in name 'exe' by nano, just like BAT file in PC. In my case, it will activate 2.8"LCD touch AUTOGUIDE WITH RASPBERRY PI FOR ASTROPHOTOGRAPHY: STAR This project is aiming for autoguiding star with low cost Raspberry Pi computer with webcam camera. Major components in this project are: Raspberry Pi (Rev B) Python (programming language) OpenCV (computer vision libery) Webcam Simple electronic circuit (Scroll to the bottom if you need language translation) AUTOGUIDE WITH RASPBERRY PI FOR ASTROPHOTOGRAPHY: MAY 2014 This project is aiming for autoguiding star with low cost Raspberry Pi computer with webcam camera. Major components in this project are: Raspberry Pi (Rev B) Python (programming language) OpenCV (computer vision libery) Webcam Simple electronic circuit (Scroll to the bottom if you need language translation) AUTOGUIDE WITH RASPBERRY PI FOR ASTROPHOTOGRAPHY: STAR Press 'p' twice to select a star. Auto guiding now. Only show 16x zoom in ROI image area. Integ value will be adjusted by the software automatically. Larger number means darker star, and the star guiding response will be a bit slower. Press 'r' for re-select another star or press 'Esc' to quit this program. AUTOGUIDE WITH RASPBERRY PI FOR ASTROPHOTOGRAPHY Prepare Raspberry Pi: Connect camera, key board, power, and so on. Login as pi. Enter password raspberry. Login as root for control GPIO pins, sudo su. I have created a short cut in name 'exe' by nano, just like BAT file in PC. In my case, it will activate 2.8"LCD touch AUTOGUIDE WITH RASPBERRY PI FOR ASTROPHOTOGRAPHY: STAR This project is aiming for autoguiding star with low cost Raspberry Pi computer with webcam camera. Major components in this project are: Raspberry Pi (Rev B) Python (programming language) OpenCV (computer vision libery) Webcam Simple electronic circuit (Scroll to the bottom if you need language translation) AUTOGUIDE WITH RASPBERRY PI FOR ASTROPHOTOGRAPHY: MAY 2014 This project is aiming for autoguiding star with low cost Raspberry Pi computer with webcam camera. Major components in this project are: Raspberry Pi (Rev B) Python (programming language) OpenCV (computer vision libery) Webcam Simple electronic circuit (Scroll to the bottom if you need language translation) AUTOGUIDE WITH RASPBERRY PI FOR ASTROPHOTOGRAPHY: STAR Press 'p' twice to select a star. Auto guiding now. Only show 16x zoom in ROI image area. Integ value will be adjusted by the software automatically. Larger number means darker star, and the star guiding response will be a bit slower. Press 'r' for re-select another star or press 'Esc' to quit this program. AUTOGUIDE WITH RASPBERRY PI FOR ASTROPHOTOGRAPHY Prepare Raspberry Pi: Connect camera, key board, power, and so on. Login as pi. Enter password raspberry. Login as root for control GPIO pins, sudo su. I have created a short cut in name 'exe' by nano, just like BAT file in PC. In my case, it will activate 2.8"LCD touch AUTOGUIDE WITH RASPBERRY PI FOR ASTROPHOTOGRAPHY: STAR This project is aiming for autoguiding star with low cost Raspberry Pi computer with webcam camera. Major components in this project are: Raspberry Pi (Rev B) Python (programming language) OpenCV (computer vision libery) Webcam Simple electronic circuit (Scroll to the bottom if you need language translation) AUTOGUIDE WITH RASPBERRY PI FOR ASTROPHOTOGRAPHY: MAY 2014 This project is aiming for autoguiding star with low cost Raspberry Pi computer with webcam camera. Major components in this project are: Raspberry Pi (Rev B) Python (programming language) OpenCV (computer vision libery) Webcam Simple electronic circuit (Scroll to the bottom if you need language translation) AUTOGUIDE WITH RASPBERRY PI FOR ASTROPHOTOGRAPHY: STAR Press 'p' twice to select a star. Auto guiding now. Only show 16x zoom in ROI image area. Integ value will be adjusted by the software automatically. Larger number means darker star, and the star guiding response will be a bit slower. Press 'r' for re-select another star or press 'Esc' to quit this program. AUTOGUIDE WITH RASPBERRY PI FOR ASTROPHOTOGRAPHY Prepare Raspberry Pi: Connect camera, key board, power, and so on. Login as pi. Enter password raspberry. Login as root for control GPIO pins, sudo su. I have created a short cut in name 'exe' by nano, just like BAT file in PC. In my case, it will activate 2.8"LCD touch AUTOGUIDE WITH RASPBERRY PI FOR ASTROPHOTOGRAPHY: STAR This project is aiming for autoguiding star with low cost Raspberry Pi computer with webcam camera. Major components in this project are: Raspberry Pi (Rev B) Python (programming language) OpenCV (computer vision libery) Webcam Simple electronic circuit (Scroll to the bottom if you need language translation) AUTOGUIDE WITH RASPBERRY PI FOR ASTROPHOTOGRAPHY: MAY 2014 This project is aiming for autoguiding star with low cost Raspberry Pi computer with webcam camera. Major components in this project are: Raspberry Pi (Rev B) Python (programming language) OpenCV (computer vision libery) Webcam Simple electronic circuit (Scroll to the bottom if you need language translation) AUTOGUIDE WITH RASPBERRY PI FOR ASTROPHOTOGRAPHY: STAR Press 'p' twice to select a star. Auto guiding now. Only show 16x zoom in ROI image area. Integ value will be adjusted by the software automatically. Larger number means darker star, and the star guiding response will be a bit slower. Press 'r' for re-select another star or press 'Esc' to quit this program. AUTOGUIDE WITH RASPBERRY PI FOR ASTROPHOTOGRAPHY Prepare Raspberry Pi: Connect camera, key board, power, and so on. Login as pi. Enter password raspberry. Login as root for control GPIO pins, sudo su. I have created a short cut in name 'exe' by nano, just like BAT file in PC. In my case, it will activate 2.8"LCD touch AUTOGUIDE WITH RASPBERRY PI FOR ASTROPHOTOGRAPHY: STAR This project is aiming for autoguiding star with low cost Raspberry Pi computer with webcam camera. Major components in this project are: Raspberry Pi (Rev B) Python (programming language) OpenCV (computer vision libery) Webcam Simple electronic circuit (Scroll to the bottom if you need language translation) AUTOGUIDE WITH RASPBERRY PI FOR ASTROPHOTOGRAPHY: MAY 2014 This project is aiming for autoguiding star with low cost Raspberry Pi computer with webcam camera. Major components in this project are: Raspberry Pi (Rev B) Python (programming language) OpenCV (computer vision libery) Webcam Simple electronic circuit (Scroll to the bottom if you need language translation) AUTOGUIDE WITH RASPBERRY PI FOR ASTROPHOTOGRAPHY: STAR Press 'p' twice to select a star. Auto guiding now. Only show 16x zoom in ROI image area. Integ value will be adjusted by the software automatically. Larger number means darker star, and the star guiding response will be a bit slower. Press 'r' for re-select another star or press 'Esc' to quit this program. AUTOGUIDE WITH RASPBERRY PI FOR ASTROPHOTOGRAPHY This project is aiming for autoguiding star with low cost Raspberry Pi computer with webcam camera. Major components in this project are: Raspberry Pi (Rev B) Python (programming language) OpenCV (computer vision libery) Webcam Simple electronic circuit (Scroll to the bottom if you need language translation) AUTOGUIDE WITH RASPBERRY PI FOR ASTROPHOTOGRAPHY: STAR This project is aiming for autoguiding star with low cost Raspberry Pi computer with webcam camera. Major components in this project are: Raspberry Pi (Rev B) Python (programming language) OpenCV (computer vision libery) Webcam Simple electronic circuit (Scroll to the bottom if you need language translation) AUTOGUIDE WITH RASPBERRY PI FOR ASTROPHOTOGRAPHY: MAY 2014 This project is aiming for autoguiding star with low cost Raspberry Pi computer with webcam camera. Major components in this project are: Raspberry Pi (Rev B) Python (programming language) OpenCV (computer vision libery) Webcam Simple electronic circuit (Scroll to the bottom if you need language translation) AUTOGUIDE WITH RASPBERRY PI FOR ASTROPHOTOGRAPHY This project is aiming for autoguiding star with low cost Raspberry Pi computer with webcam camera. Major components in this project are: Raspberry Pi (Rev B) Python (programming language) OpenCV (computer vision libery) Webcam Simple electronic circuit (Scroll to the bottom if you need language translation) AUTOGUIDE WITH RASPBERRY PI FOR ASTROPHOTOGRAPHY: STAR This project is aiming for autoguiding star with low cost Raspberry Pi computer with webcam camera. Major components in this project are: Raspberry Pi (Rev B) Python (programming language) OpenCV (computer vision libery) Webcam Simple electronic circuit (Scroll to the bottom if you need language translation) AUTOGUIDE WITH RASPBERRY PI FOR ASTROPHOTOGRAPHY: MAY 2014 This project is aiming for autoguiding star with low cost Raspberry Pi computer with webcam camera. Major components in this project are: Raspberry Pi (Rev B) Python (programming language) OpenCV (computer vision libery) Webcam Simple electronic circuit (Scroll to the bottom if you need language translation) AUTOGUIDE WITH RASPBERRY PI FOR ASTROPHOTOGRAPHY This project is aiming for autoguiding star with low cost Raspberry Pi computer with webcam camera. Major components in this project are: Raspberry Pi (Rev B) Python (programming language) OpenCV (computer vision libery) Webcam Simple electronic circuit (Scroll to the bottom if you need language translation) AUTOGUIDE WITH RASPBERRY PI FOR ASTROPHOTOGRAPHY: STAR This project is aiming for autoguiding star with low cost Raspberry Pi computer with webcam camera. Major components in this project are: Raspberry Pi (Rev B) Python (programming language) OpenCV (computer vision libery) Webcam Simple electronic circuit (Scroll to the bottom if you need language translation) AUTOGUIDE WITH RASPBERRY PI FOR ASTROPHOTOGRAPHY: MAY 2014 This project is aiming for autoguiding star with low cost Raspberry Pi computer with webcam camera. Major components in this project are: Raspberry Pi (Rev B) Python (programming language) OpenCV (computer vision libery) Webcam Simple electronic circuit (Scroll to the bottom if you need language translation) AUTOGUIDE WITH RASPBERRY PI FOR ASTROPHOTOGRAPHY This project is aiming for autoguiding star with low cost Raspberry Pi computer with webcam camera. Major components in this project are: Raspberry Pi (Rev B) Python (programming language) OpenCV (computer vision libery) Webcam Simple electronic circuit (Scroll to the bottom if you need language translation) FRIDAY, MAY 30, 2014 STAR AUTOGUIDE WITH RPI - (6) OPERATION PROCEDURE STAR AUTOGUIDE WITH RPI - OPERATION PROCEDURE key = cv.WaitKey(20) if key == 32: #press space to move to next step break
What if I discount and re-connect the guiding cable from EQ-G? Posted by Unknown at
* Note:
* I do not know how to setup 'autostart' to switch display to LCD display, login into startX, and execute my python program automatically on RPi. With my wireless keyboard and without external monitor, after turn on RPi, wait until RPi's LED stop blanking (it means it is ready to login), and then login blindly until LCD display has been turn on again. If you know how to setup auto start on RPi. It will save you a lot of trouble. * I develop all my program on PC and then transfer to RPi. It save me a lot of programming time. It is much easier working ortroubleshoot on PC.
* Prepare Raspberry Pi: Connect camera, key board, power, and so on* Login as pi
* Enter password raspberry * Login as root for control GPIO pins, sudo su * I have created a short cut in name 'exe' by nano, just like BAT file in PC. In my case, it will activate 2.8"LCD touch screen, and execute startX program) exe * in StatX, double click the Python program, say 'st7.py' (you canuse any filename))
* I: mean current maximum intensity pixels * MAX I: The maximum of previous I * INTEG: It is the number of image integration. Default is 5 now * Press up/down key to increase/decrease the image intensity. After press up arrowhead for three time. 'Integ' has been increased from 5 to 8 now, and the image is much brighter compare toprevious picture.
* Press space switch to next window for star selection, and press any key for the next star * Press 'p' twice to select a star * Auto guiding now. Only show 16x zoom in ROI image area. Integ value will be adjusted by the software automatically. Larger number means darker star, and the star guiding response will be a bit slower. * Press 'r' for re-select another star or press 'Esc' to quit thisprogram
* Below video conclude this project.Enjoy...
4/1/2016 Update: You may find another camera option from Amazon.com. http://www.amazon.com/XCSOURCE-Telescope-Electronic-Eyepiece-DC625/dp/B00ZUF90J2?ie=UTF8&psc=1&redirect=true&ref_=ox_sc_act_title_3&smid=A38N3TNH1N2LMX Posted by Unknown at10:03 PM
7 comments:
Email This
BlogThis!
Share
to Twitter
Share
to Facebook
Share
to Pinterest
STAR AUTOGUIDE WITH RPI - (5) PYTHON CODE ##################################################################################
# Auto Guide with RPi # by Samson Yang 5/30/2014 # Hardware requirement: # Raspberry Pi Model B # USB camera # Wireless keyboard (optional) # Adafruit PiTFT Mini Kit - 320x240 2.8" TFT (optional) # Custom PCB#
# Software:
# python 2.7, OpenCV V2.4.6 and numpy.#
# Blogger:
https://www.blogger.com/blogger.g?blogID=634479844432177891#allposts # Youtube: https://www.youtube.com/watch?v=1k9vwmUJgbM#
# Note:
# Author is just a beginner to Python. Please feel free to modify this program for your own project. # Due to time constrain and limited programming skill, there will be no technical support for these code. # Have fun and good luck. :)#
################################################################################# GP=1 #see below note #GP=0 For PC only, GPIO will not be activated #GP=1 For RPi only, GPIO will control telescope mount. EQG has beentested.
import cv2
import cv2.cv as cv
import numpy as np
from random import randrange# For GPIO Control
# Dec-, green, GPIO#22 # Dec+, yellow, GPIO#4 # Ra-, blue, GPIO#17# Ra+, red, GPIO#18
if GP==1:
from time import sleep import RPi.GPIO as GPIO GPIO.setmode(GPIO.BCM) #Assign GPIO numberRP=18 #R+
RN=17 #R-
DP=4 #D+
DN=22 #D-
#Setip up for GPIO Pin GPIO.setup(RP, GPIO.OUT) GPIO.setup(RN, GPIO.OUT) GPIO.setup(DP, GPIO.OUT) GPIO.setup(DN, GPIO.OUT) GPIO.output(RP, False) GPIO.output(RN, False) GPIO.output(DP, False) GPIO.output(DN, False)#setup camera
print "Initializing camera......." np.set_printoptions(threshold='nan') if GP==1: #work on RPi cap = cv2.VideoCapture(0) #for camera 0 on RPi if GP==0: #work on PC cap = cv2.VideoCapture(1) #for camera 0 on RPi ret, frame = cap.read() print "Camera is initialized."qq=1
while qq==1:
#while loop until find a good starX1=0
NoIntegration=5
while X1==0:
maxStartBrightness=0 while True:# for image integration temptrackStar=0 countloop=0 for countloop in range (0,NoIntegration):
ret, frame = cap.read() imggray = cv2.cvtColor(frame, cv2.COLOR_BGR2GRAY) temptrackStar=temptrackStar+imggray imggray=temptrackStar
maxBright = imggray.max() ratio=255/maxBright #normalization ratio imggray = imggray*ratio #normalized image if maxStartBrightness
if key == 2490368: #press up for increase image
brightness
NoIntegration=NoIntegration+1 if key == 2621440: #press down for decrease imagebrightness
NoIntegration=NoIntegration-1 if NoIntegration<=1: NoIntegration=1 cv.DestroyAllWindows() img=imggray.copy() #Star location trackX=np.dtype('float16') trackY=np.dtype('float16')trackX=0.
trackY=0.
img2=img.copy() #For display only cv.WaitKey(20) maxpix = img bY, bX = img.shape #Finding all star uX = 1.0*(img.max(axis=0)) #sum o column uY = 1.0*(img.max(axis=1)) #sum of rownX = 0
nY = 0
X = np.zeros(10000) Y = np.zeros(10000) #Set star intensity threshold (self setting) # criteria is >50% of max intensity Threshold = uX.max()*0.5 Sub_Search_range=15 for c in range(0,bX-1): if (uX >=Threshold)*(uX<=Threshold): X=c nX=nX+1 else: uX=0 for r in range(0,bY-1): if (uY >=Threshold)*(uY<=Threshold): Y=r nY=nY+1 else: uY=0uY=0
uX=0
# Search for star starCount=0X1=0
Y1=0
for c in range (0,nX): for r in range(0,nY): img2=img.copy() ulX=X-Sub_Search_range ulY=Y-Sub_Search_range lrX=X+Sub_Search_range lrY=Y+Sub_Search_range #print ulX,lrX,ulY,lrY if ulX<=0: ulX=0 if ulY<=0: ulY=0 if lrX>=bX-1: lrX=bX-1 if lrY>=bY-1: lrY=bY-1 temp = img.max() if temp>=Threshold: trackY = Y trackX = X starCount=starCount+1 cv2.rectangle(img2, (int(ulX),int(ulY)),(int(lrX),int(lrY)), 255, 1) cv2.putText(img2,"Press any key for search next star.", (5,25), cv2.FONT_HERSHEY_SIMPLEX, 1, 255,1) cv2.putText(img2,"Press 'p' to pick your star for guiding.", (5,60), cv2.FONT_HERSHEY_SIMPLEX, 1, 255,1) #Reduce screen size newx,newy = img2.shape/2,img2.shape/2 img3 = cv2.resize(img2,(newx,newy)) cv2.imshow("stars",img3) #print "Press 'p' to choose your star:" if X1==0: print cv.WaitKey() if cv.WaitKey()==112: Y1=Y X1=XtrackY=Y1
trackX=X1
cv2.destroyAllWindows() #end of while loop ################################ cv2.destroyAllWindows() trackBoxC=100 #tracking box size trackBoxR=160 #tracking box sizerefX=0.
refY=0.
averageX=0
averageY=0
averageCount=0
temptrackStar=0
checkS=0
blureFactor=2 # The most stable factor is 2while True:
#Star image integration (make it brighter) starInteg=0 temptrackStar=0checkS=0
while checkS<127: ret, frame = cap.read() img2 = cv2.cvtColor(frame, cv2.COLOR_BGR2GRAY) trackStar = img2 temptrackStar=temptrackStar+trackStar starInteg=starInteg+1 checkS=temptrackStar.max() trackStar=temptrackStar#/starInteg #Blure and normalize star image trackStar=cv2.GaussianBlur(trackStar,(0,0),blureFactor) maxBright=trackStar.max() ratio=255/maxBright #normalization ratio trackStar = trackStar*ratio #normalized image #Find X and Y star profile c=trackStar.max(axis=0) r=trackStar.max(axis=1) peakP=c.max()*0.8 #caculate the 80% or higher averagecount=0
peakY=0
for cc in range (0,len(c)): if c > peakP: peakY=peakY+cc count = count+1 if count<>0: peakY=1.0*peakY/countelse:
print "Error count = 0, #111"count=0
peakX=0
for rr in range (0,len(r)): if r > peakP: peakX=peakX+rr count = count+1 if count>0: peakX=1.0*peakX/countelse:
print"Cannot find star!" if refX==0: refX=peakX refY=peakY#Finding average star position averageX = averageX+peakX*1.00-refX averageY = averageY+peakY*1.00-refY averageCount=averageCount+1 if averageCount==5: averageCount=0 if peakY>=trackBoxR: peakY=trackBoxR if peakX>=trackBoxC: peakX=trackBoxC if peakY<0: peakY=0 if peakX<0: peakX=0 offsetX = -1*(peakY*1.00-refY) offsetY = -1*(peakX*1.00-refX)
if GP==1:
#Star Guiding if offsetY>1: #R+ GPIO.output(RP, True) else: GPIO.output(RP, False) if offsetY<-1: #R- GPIO.output(RN, True) else: GPIO.output(RN, False) if offsetX>1: #D+ GPIO.output(DP, True) else: GPIO.output(DP, False) if offsetX<-1: #D- GPIO.output(DN, True) else: GPIO.output(DN, False) #Display cross, box, and single star image iBox=10 #inner box size cv2.line(trackStar,(0,trackBoxC/2) , (trackBoxR/2-iBox,trackBoxC/2), 80,1) cv2.line(trackStar,(trackBoxR/2+iBox,trackBoxC/2) , (trackBoxR,trackBoxC/2), 80,1) cv2.line(trackStar,(trackBoxR/2,0) , (trackBoxR/2,trackBoxC/2-iBox), 80,1) cv2.line(trackStar,(trackBoxR/2,trackBoxC/2+iBox) , (trackBoxR/2,trackBoxC), 80,1) cv2.rectangle(trackStar, (trackBoxR/2-iBox,trackBoxC/2-iBox),(trackBoxR/2+iBox,trackBoxC/2+iBox),125, 1)
displaytext = "Offset:("+str(offsetX)+","+str(offsetY)+")" cv2.putText(trackStar,displaytext, (2,10), cv2.FONT_HERSHEY_SIMPLEX, 0.3, 125,1) displaytext = "Integ: "+str(starInteg)+"." cv2.putText(trackStar,displaytext, (2,90), cv2.FONT_HERSHEY_SIMPLEX, 0.3, 125,1) #display . on screen randemly, so we know it is alive if randrange(10)>5: cv2.putText(trackStar,".", (125,10), cv2.FONT_HERSHEY_SIMPLEX, 0.3, 60,1) #Reduce screen size img3 = cv2.resize(trackStar,(trackBoxR*2,trackBoxC*2)) cv2.imshow("Lock on star",img3) key=cv.WaitKey(20) if key==114: #press r to redo image cv2.destroyAllWindows() break if key==27: #pressw q to quit qq=0 cv2.destroyAllWindows() breakif GP==1:
#Turn off all GPIO ports GPIO.output(4, False) GPIO.output(17, False) GPIO.output(18, False) GPIO.output(22, False) cv2.destroyAllWindows() Posted by Unknown at9:22 PM
15 comments:
Email This
BlogThis!
Share
to Twitter
Share
to Facebook
Share
to Pinterest
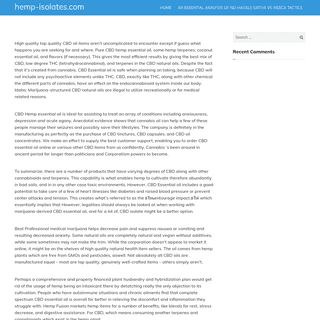
STAR AUTOGUIDE WITH RPI - (4) ELECTRONIC CIRCUIT The Orion Atlas EQ-G autoguide port is shown in below picture. A simple circuit has been design for making the connection between RPi and EQ-G autoguide port. The color of LED and the GPIO pin# from RPi are following: Yellow LED, Dec +, GPIO #4 Green LED, Dec -, GPIO #22 Blue LED, RA-, GPIO #17 Red LED, RA+, GPIO #18 Below is the circuit board based on above configuration. Next step: Connect RPi auto guide cable to EQ-G. Setup for the real test now The webcam has been installed to 400mm guide scope. Now, start the star auto guiding test. A bright star has been chosen for the test. You may skip the lengthy boring start auto guiding process. Itjust for a record.
Test with 2 pixels tolerance and x0.5 autoguiding speed. Again you may skip the lengthy boring star auto guiding process too. Test with 1 pixels tolerance and x0.125 auto guiding speed.9:21 PM
12 comments:
Email This
BlogThis!
Share
to Twitter
Share
to Facebook
Share
to Pinterest
SATURDAY, APRIL 19, 2014 STAR AUTOGUIDE WITH RPI - (2) ARTIFICIAL STAR FOR SOFTWARE TESTING The first problem come to me is how do I test my software. I need a small bright spot act as star. First, what I did is holding a flashlight and create a pinhole with may hand. Of course, the room light has been turned off. This method work for two days, but it is really annoying. Because the room light need to be turn on and off, and the star light intensity, size and position are not stable. Therefore, I have invented another 'clever' method. Use a piece of black paper with white dots. It fails at the first few trials, thenI give it up.
So, I decide to create a artificial star by using optical method. The end product looks like a big funny looking gun, and it worksvery well!! :)
Here is how I build the artificial star for testing my software. First, Find a lens (my lens has 16" focal length) and PVC pipe. Below is just a empty tube with a lens insider. Lens to the end of tube (black PVC) is about 16" apart. Total cost ~$15. Just a lens inside of tube, nothing else. Make many (>20) pinholes on a sheet of aluminum foil. within 1" diameter area. If possible, try to make those holes as small aspossible.
Attach it to the end of reversed telescope tube. And then put itaside for now.
Webcam modification. I just pick a random bullet shape webcam for this application. If you know any camera sensor with higher sensitivity, use it. Below webcam cost ~$10 for a new one. Remove front cover and lenses. If you know how to remove IR block filter, remove it for better light sensitivity. Wrap paper around the camera for better fitting into guide scope. Insert the webcam into guide scope. Wrap paper around the tip of guide scope too for better fitting to artificial star generator. Next, adjust focus... Done! The webcam can pick up 'star' from ambient light through pinholes. Just point it to a wall, and the many 'star' images already saturated. The result is much better then expected. Posted by Unknown at11:32 PM
1 comment:
Email This
BlogThis!
Share
to Twitter
Share
to Facebook
Share
to Pinterest
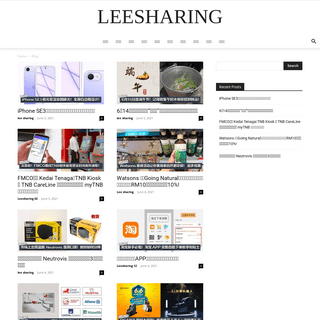
THURSDAY, APRIL 17, 2014 STAR AUTOGUIDE WITH RPI - (3) 1ST FEASIBILITY TEST WITH A TELESCOPEON A MOUNT
I have done the first feasibility test with a real telescope scope. The program was written in Python with Open CV on Raspberry Pi + Adafruit 2.8" LCD. It can assist me finding a star, focus on it, and let me pick a star for guiding. Above picture show Raspberry Pi and a Webcam connect to my guidescope.
So far, the mount control circuit is not setup, and the GUI is not user friendly yet. We are testing software and camera for now. The next step will be connecting RPi with my telescope mount for a realstar auto guiding.
I skip many step in this blog. After the project is finish, I will rewrite the entire blog for a record. Enjoy it. Posted by Unknown at11:49 PM
4 comments:
Email This
BlogThis!
Share
to Twitter
Share
to Facebook
Share
to Pinterest
TUESDAY, APRIL 15, 2014 STAR AUTOGUIDE WITH RPI - (1) FOREWORD OF THIS PROJECT Most people who enjoy taking astrophotography with autoguide system as their standard equipment. But it requires a laptop to control it. It takes space, consume battery power, and require complicate setup. It is quite troublesome working with it. It also very expensivetoo.
I would like to simplify that setup, reduce battery consumption with minimized budget; therefore I choose Raspberry Pi ($39), Adafruit 2.8" LCD ($35), Open CV (free), reversed telescope ($20), and a webcam($10).
Enjoy...
Posted by Unknown at12:16 PM
5 comments:
Email This
BlogThis!
Share
to Twitter
Share
to Facebook
Share
to Pinterest
Home
Subscribe to: Posts (Atom)POPULAR POSTS
*
Star autoguide with RPi - (4) Electronic circuit The Orion Atlas EQ-G autoguide port is shown in below picture. A simple circuit has been design for making the connection between RPi...
*
Star Autoguide with RPi - (5) Python code ################################################################################# # # Auto Guide with RPi # by Samson Yang 5/30/2014 #...*
Star autoguide with RPi - (3) 1st feasibility test with a telescope ona mount
I have done the first feasibility test with a real telescope scope. The program was written in Python with Open CV on Raspberry Pi +Adaf...
*
Star autoguide with RPi - (1) Foreword of this Project Most people who enjoy taking astrophotography with autoguide system as their standard equipment. But it requires a laptop to control it.I...
TRANSLATE
Select Language▼ Watermark theme. Powered by Blogger .ORIGINAL TEXT
Contribute a better translation -------------------------Details
4